I. Connect the cash drawer to your printer
Your cash drawer should be plugged directly into the back of your printer via an RJ11/RJ12 cable (these look similar to phone cables).
- Ensure the cable is plugged into the correct port on the receipt printer.
For Epson printers, the cash drawer port is labeled by an image of a cash drawer and the letters DK. Example of cash drawer port on Epson TM-T88 printers: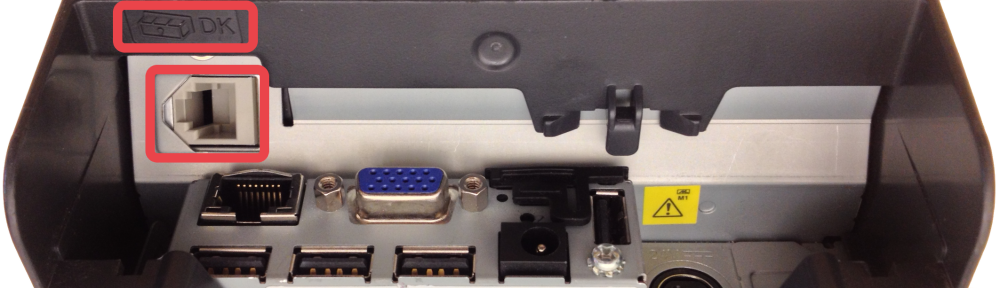
For Star Micronics printers, the cash drawer port is usually labelled by the letters DK.
Example of cash drawer port on Star TSP100 printers: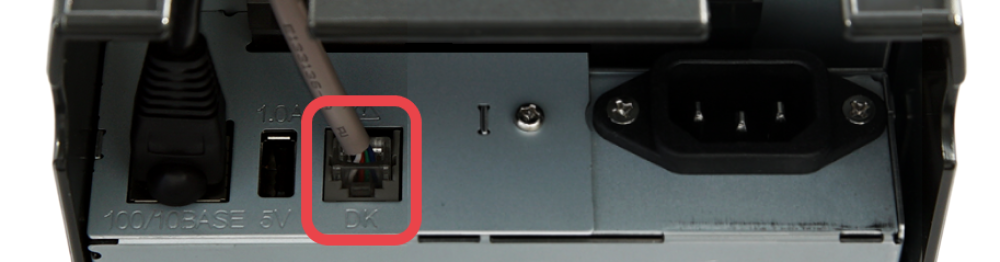
On other printers, the cash drawer port may be labelled differently. Please refer to the printer manual to confirm where the cash drawer port is. - Ensure that the other end of the cable is plugged directly into the cash drawer.
II.Configure your cash drawer to open for Epson printers
- From the Windows POS device search menu, search for Printers & scanners (or Devices & printers depending on the version of Windows).
- Click on your receipt printer in the list of printers and click Manage.
- Click on Printer properties.
- Click Advanced
- Click Printing defaults
- Switch to the Peripherals tab.
- Select Cash Drawer from the drop-down list.
- If you want the drawer to open before the receipt is printed stay on the Document Top tab, otherwise, if you want the drawer to open after the receipt is printed switch to the Document Bottom tab.
- Set Cash Drawer #1 (2 pins) to Open and set Cash Drawer #2 (5 pins) to Open.
- Press Apply and OK to save the settings.
III. Configure your cash drawer to open for Star printers
- From the Windows POS device search menu, search for Printers & scanners (or Devices & printers depending on the version of Windows)
- Click on your receipt printer in the list of printers and click Manage.
- Click on Printer properties.
- Switch to the Device Settings tab.
- Check the following:
- Peripheral Unit Type should be set to Cash Drawer.
- Peripheral Unit 1 should be set to Document Top if you want the drawer to open before the receipt is printed, or Document Bottom, if you want the drawer to open after the receipt is printed.
- Do the same for Peripheral Unit 2.
- Press OK to save the settings.